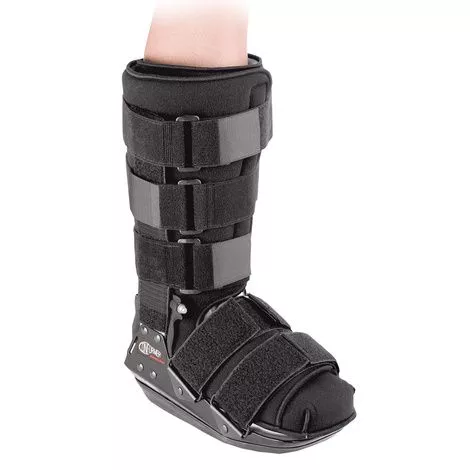
Bledsoe Conformer Walking Boot Features
- Dual density mid-sole foam promotes perimeter loading
- Molded inner liner encases the foot and lower leg
- Diabetic sock included
- Aluminum boot shell and upright system
- Unlike plastic boots, can be reformed to fit virtually any leg or ankle shape
- Can be removed for daily cleaning, dressing changes, and medication
- Unique “Automold” triple density footbed comprised of an auto-molding innersole
- New pre-molded dual density midsole
- Designed to evenly distribute weight across the entire bottom surface of the foot
- Innersole molds itself to the foot shape
- Midsole is specially designed to provide maximum perimeter loading
- Superior to a total contact cast
- Versatile-use one device for the entire duration of treatment
- Common Examples of Use:
– Sensate and non-sensate patients
– Ulcerative / pre-ulcerative conditions
– Diabetic patients
– Ankle joint instability - Instruction Manual
What to buy with Bledsoe Conformer Boot?
Instructions
- Apply the sock provided
- Prepare the bledsoe boots
Remove the foam from the boot (Charcot Conformer: Also remove the black plastic PTB plate.) - Apply the bootie
- Slip the foot into the bootie with the toes beneath the tongue. Slide the heel of the foot all the way to the back of the bootie. Make certain the foot is centered from the left to right on the white innersole section.
- Close the foam on the forefoot.
- Secure the bootie
- Wrap the foam section around the leg by tucking in the long end of the foam cuff.
- Adjust the tension on the wrap, and close the hook and loop closure.
- If the cuff is too long, trim with scissors.
- Apply the boot
Make sure the plastic covers are still on the boot uprights. Slip the bootie into the boot, position it evenly front to back. Stand and place full body weight on the boot for 30 seconds.
NOTE: When properly positioned, the white innersole should fit completely inside the black midsole. - Secure the uprights
- While still bearing weight and with the foot pointed directly forward, align the uprights with the sides of the leg parallel to the leg bones. When the uprights are properly aligned with the leg, remove the plastic from the uprights and press the uprights against the side of the leg to engage the hook material to the bootie.
- Save the plastic covers for reapplication after washing the bootie.
- Secure the forefoot straps
While standing, wrap the forefoot straps over the top of the foot, through the D-rings and pull back to tension. If necessary, trim the excess strap length with scissors. - Adjust the rear plate
If necessary, reapply the plastic plate containing the straps so that the top of the plate is positioned about an inch below the top edge of the foam cuff. Make sure the plate is centered (left to right) on the bootie at the back of the calf. The straps should remain attached to the plate.
NOTE: If necessary, the plate may be repositioned higher or lower to allow the straps to align with the attachments on the uprights. - Apply the PTB strap
- While standing, apply the PTB plate. The plastic should cover the patella tendon. Press on the sides of the plate to ensure the hook engages the bootie.
- Unwind the strap from the upright and wrap around the front of the boot and loop through the D-ring on the opposite upright. Adjust the tension of the strap using the hook and loop fastener on the strap end.
- Secure the leg straps
- While still standing, begin at the ankle. Wrap both strap ends firmly forward to engage the straps with the hook material on the outside of the uprights.
- Look the end of the strap through the D-ring and pull back to tension. Press hook end to strap to engage.
- Repeat Above steps for the remaining straps.